Working with the Show Filter Search
The show filters feature is a powerful search feature that you can use to quickly find what you are looking for in Service Manager. It works in conjunction with saved searches to help you perform a search task without manually entering all of the search conditions each time.
Using the filter search is an easy way to view common lists of items that you need to review every day such as unassigned incidents or open items.
You can use the show filters feature to enter search criteria. You can then view all of the saved searches available to your role that are applicable to the workspace in which you are working.
The show filters feature works in conjunction with a search crumb. If you click Show Filters, the application displays the criteria and user-defined filters that have already been defined within that particular saved search.
To use the show filters feature, the administrator must define the filters for each business object.
In the Search Filters panel, the columns left to right use an "and" > conjunction. When you move up or down the application adds an "or" conjunction while filtering the data.
Using the Show Filters Feature
Follow these steps to use the filter search feature:
1.Log in to the Service Desk console.
2.Open a workspace.
3.Click the Show Filters option to display the Search Filters panel.
4.Click more to display additional filter options.
5.Check the options on which to filter. As you check options, the application updates the list of items in the list.
6.To reset the search filter, do any of the following:
•Clear the options that you checked in the Search Filters panel.
•From the search crumb, click the  icon next to an option to remove that option from the search filter.
•From the search crumb, click clear all to clear all options from the search filter.
About Search Crumbs
As you check options in the Search Filters panel, the systems adds them to a search crumb at the top of the workspace. The following example shows a search crumb that contains the "and" and "or" conjunction.
Search Crumbs
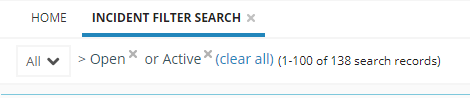
You can hover the mouse over a search crumb to see a tool tip that explains its function.
For example, the tool tip for the Active search crumb in the example above is "Status equal to Active".
Saving Your Filter as a Saved Search
Follow these steps to save the filter that you created as a saved search:
1.Log in to the Service Desk console.
2.Open a workspace.
3.Click Show Filters to display the Search Filters panel.
4.Check the options on which to filter.
5.Click Save as Saved Search in the lower right corner of the panel.
6.Enter a unique name in the Search Name field.
7.To allow others to access your saved search, do one of the following:
•In the Search Usage drop-down menu, select the roles to provide access your saved search.
• Select All to provide access to all roles.
8.Check Include this search in my favorites list. to include the saved search in your favorites list. The application shows all saved searches that are marked as a favorite in the saved search drop-down list.
9.Click Save.